
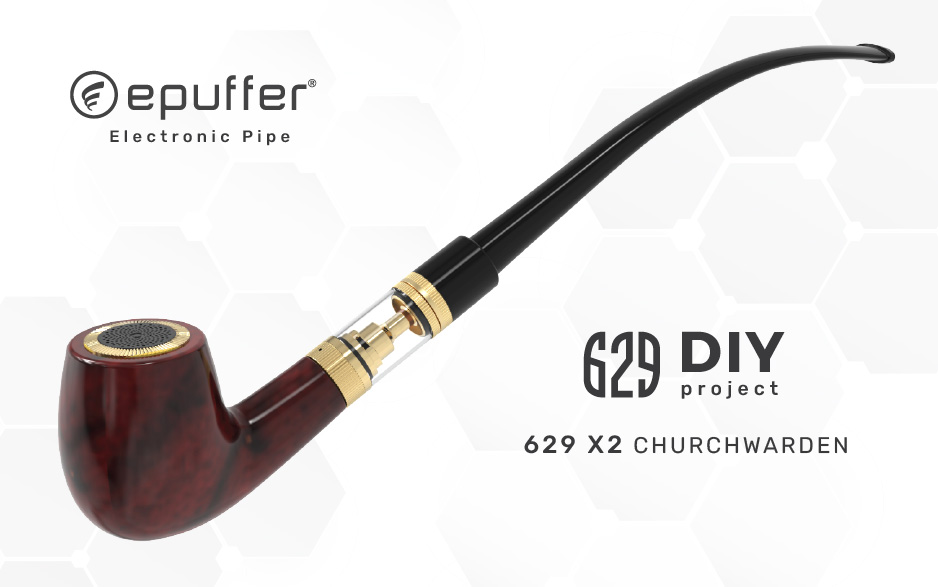
Crafting Your Own Electronic Pipe: A DIY Guide for ePuffer 629 X2 Churchwarden aka Gandalf ePipe.
Introduction
Electronic pipes have become a popular alternative for those who enjoy the ritualistic experience of smoking but want to avoid the harmful effects of traditional tobacco. With ePuffer epipe spare parts and a bit of DIY spirit, you can create your own customized electronic pipe. In this guide, we'll walk you through the process step-by-step, ensuring a smooth and satisfying vaping experience.
Building your own electronic pipe using ePuffer genuine spare parts is a fun and rewarding project for vaping enthusiasts. With a little patience and creativity, you can create a custom e-pipe that perfectly suits your preferences. Just remember to follow all guidelines and tips to ensure a safe and enjoyable vaping experience. Let's get started.
ePipe 629 X2 DIY Parts List:
ePuffer 629 X2 Electronic Pipe Bowl
ePuffer 629 X2 Vape Tank Gold or Silver
ePuffer 629 X2 Atomizer Coils
ePuffer Churchwarden Long Stem Mouthpiece
ePuffer 18350 Rechargeable Battery
Nitecore 18350 Battery Charger
E-liquid of your choice
Optional:
Gold Trim LED Cap with Stealth Black Crystal
Silver Trim LED Cap with Stealth Black Crystal
Solid Rosewood e-Pipe Stand
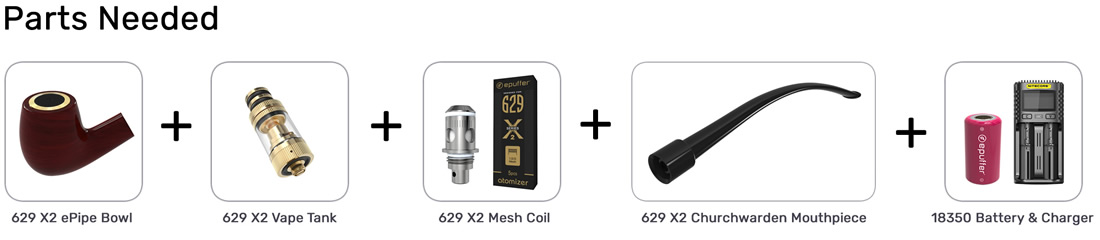
Gather Your Parts - Ensure you have all the necessary components from your ePuffer Parts needed list. This typically includes the pipe bowl, stem, heating element, mouthpiece, and any necessary batteries and chargers.
Prepare Your Workspace - Set up a clean and well-lit workspace with ample room to maneuver. It's important to have a stable surface to work on.
Step 1: Vape Tank Assembly - Coil installation
Unscrew the Liquamizer Base, then install or replace the atomizer coil as shown in the illustration below.
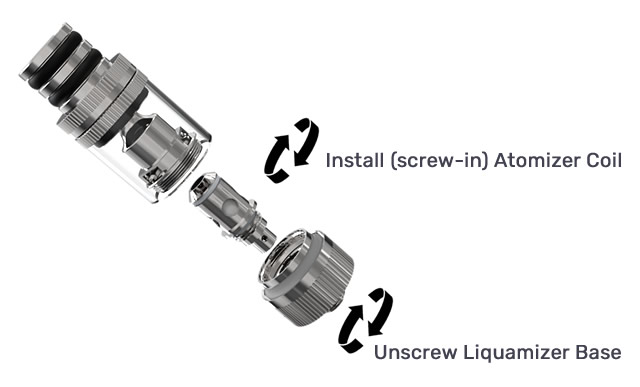
Tip! For the best vaping experience we highly recommend priming new coils before installation. Simply drip 5-6 drops of eliquid inside the atomizer coil, allow 4-5 minutes before installing.
Step 2: Vape Tank Assembly - Eliquid refilling
Unscrew the mouthpiece base and carefully drip e-liquid into one of the side windows of the liquamizer vape tank. Be cautious to avoid filling the center airflow hole.
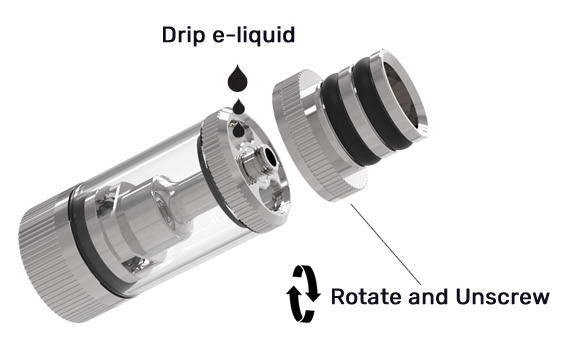
Tip! Allow 7-8 minutes for the e-liquid to feed into the atomizer before you start vaping.
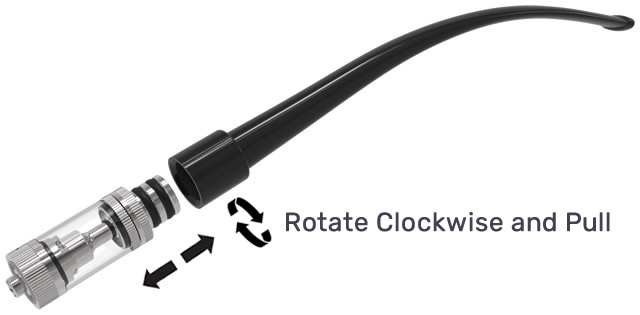
Step 3: Mouthpiece Assembly - Churchwarden Stem Installation
Enjoy!
With your DIY electronic pipe complete, fill the tank with your favorite e-liquid, and take a moment to admire your handiwork. Then, sit back, relax, and enjoy a flavorful vaping experience without the harmful effects of tobacco.

Conclusion:
Crafting your own electronic pipe using ePuffer genuine 629 X2 spare parts is a rewarding DIY project that allows you to customize your vaping experience to suit your preferences. By following these simple steps and exercising care and attention to detail, you can create a high-quality electronic pipe that provides hours of enjoyment.
